Category Archives: Uncategorized

Fixing a Wobbly Lamp Using a Lock Washer


Right between the saddle and the long neck on this lamp is the key to keeping it from wobbling — a lock washer.  Before that fix, for the longest time, this nice porcelain retro lamp leaned a bit:

There are dozens of posts on the internet that describe how to rewire a lamp, but they often skip the part about including a lock washer on each side of the assembly (inside and outside the lamp) to keep it from unscrewing itself and becoming wobbly over time.  I learned this trick from the people at Royal Touch at Coit and Arapaho in Dallas.

Here is a closeup of a lock washer:

Also – when rewiring don’t forget your underwriter’s knot:


This great illustration comes from the Flickr account of b_light, who has an awesome photo set on How to Wire a Lamp.  It is worth a look.

Here is the rewired lamp with a new $10 shade from Tuesday Morning:

Before and After, Washer-Dryer

O good times, for this…

… is now this …

Fancy!  My new washer and dryer play music.  I pulled the trigger on this purchase recently when the old Kenmore washer started leaking.  So far I have found front-loading far superior:

  • The washer uses far less water, less than you would think could clean anything.  Before, I thought if you opened a front-loader mid-cycle, water would spill out everywhere.  Not so, because the clothes at their wettest are merely soaked.
  • The dryer filter ends up with a fraction of the lint the old machine produced, ergo clothes must be less beat up in this process.
  • The “Steam Refresh” cycle on the dryer removes odors and wrinkles.  I am gradually refreshing more things instead of washing.
  • The stationary drying rack lets you dry items like sneakers and delicates without tumbling.

This Samsung pair was disturbingly expensive but ranked first in the Consumer Reports test.  I highly recommend if you have to replace your set.

The Ravendale Greenhouse

greenhouse

It’s a lucky week for me.  Check out my new find.  It’s a greenhouse!  Recovered from brush and bulky!  Without a doubt my best (and largest) trash find ever.

The process of acquiring the greenhouse was quite a thrill.  I spied it on a nearby block while riding in a car with a business associate.  She had driven us from an office downtown to a meeting in Garland.  We swung back through my neighborhood so she could show me a house she’s thinking about buying on our way back to the downtown office.  It was pure coincidence that this block was a quarter mile from mine.  I thought about asking her to stop the car so I could exit and examine it, but I wasn’t sure that would give such a good impression.  Let’s talk business… no wait a sec, lemme go pick through this pile of trash over here first.

After returning downtown to fetch my car, I drove back and eventually found it again.  A neighbor and a couple passing cars were eyeing the structure, which was sitting in the street, just past the curb.  I knew time was of the essence here, it was quite heavy, and I didn’t have the truck.

Hmmmm, how to move something fast during the day in my neighborhood?  Lawn crew!  It took about ten seconds to find some guys with a flatbed.  Communicating was difficult, but with hand signals and gestures they got the point that I needed some help moving something a few blocks.  I offered $30 but ended up paying $40, as it required moving a bunch of equipment from the trailer to the truck.  In retrospect perhaps I should have been more shrewd.  I find that the rule of Craigslist, garage sales, and just about every other junk transaction is that you should take the asking price or first number you expect to pay, and knock it down by about a third.  Maybe more.

For now it’s in my back drive, waiting for me to figure a final space for it.  It needs a replacement roof panel, and it could do with a new paint job on the frame, but other than that she seems good to go.  In the spirit of naming great estates and boats and all things fancy, I am naming her The Ravendale Greenhouse, for the street on which I found her.

Obvious Fixes

Fence Repair, originally uploaded by espeedy123.

Do you ever fix something and find that the new material makes the old look much shabbier? Seems like this has happened to me a lot lately….

* New cedar next to old
* Bright white caulk around old tub
* Sleek stainless dishwasher in clunky old kitchen

Squirrel was Here

Squirrel was Here, originally uploaded by espeedy123.

Your eyes do not deceive you. This is a ripe, half-eaten homegrown tomato perched atop my backyard fence. Deposited by a squirrel no doubt. Looking outside my kitchen window, I witnessed perhaps the same squirrel running up my neighbors roof with a smaller red one in its filthy undeserving mouth.

How depressing. To avoid this I believe you either must pick them green and let them ripen inside or create a physical barrier with netting. I hate to pick them unripe because they don’t taste as good. What’s the point? But I’ve been so busy the net’s not quite situated right. Obviously. Need to work on that. But until then, it appears I’m writing off a chunk of my crop to the squirrels.

Making More Free Thyme

Woolly Thyme, originally uploaded by patrick_standish.

I love that garden magazine look of wooly thyme creeping between stones. I have a flagstone edge along my front flower bed, and I would love it if I could get thyme growing between all the nooks and crannies and spilling over onto the rocks.

It would cost a fortune to buy the dozens of little thyme plants at the nursery, so this spring I put a couple small thyme plants I received at the spring plant swap into a container out back. Here is what they spread into over the summer:

Earthbox Thyme

This morning I cut 5 inch patches out of the planter and started inserting them along the rock edge. I used a knife to get a clean cut, and so far I’m surprised how far the patch is going. I think it will look fabulous once it gets going in its new home! If only it didn’t take all summer to get this accomplished.

Thyme Between Stones

Improving the Square Foot Garden

“Homely Homer” Tomatoes, originally uploaded by espeedy123.

My fall tomatoes are going strong and starting to ripen. They are doing considerably better than my summer ones did. I imagine it’s because I chose better varieties, and because it’s easier to keep them watered when it’s slightly cooler outside.

I also decided to change up the trellis for the fall garden. This old setup with the rigid panel made it difficult to reach through to the middle of the garden. It also didn’t seem very feng shui.

IMG_1642

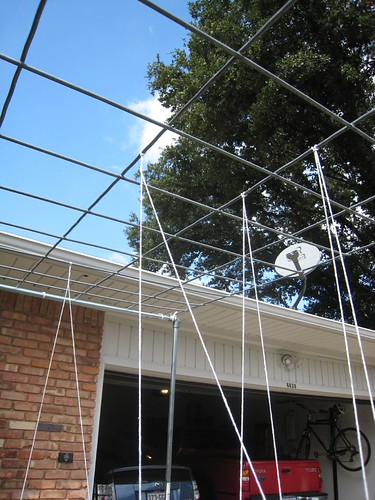
I needed something more flexible, that would allow tieing up tomatoes and beans in other parts of the box. To achieve this I decided to turn the cattle panel into a roof instead of a wall. Using a few more piece of conduit and zip ties, this is what I came up with:

IMG_2283

So far it seems to be a much more workable system. Here is the mound of pole beans climbing up the string:

IMG_2342

And the string on the trellis:

IMG_2343

The overall garden:

IMG_2344

Installing New Exterior Shutters

Installing Shutters, originally uploaded by espeedy123.

This week as economic turmoil and political gamesmanship ruled the news I felt like focusing my attention more intently on the house. I tackled a project that’s been sitting undone for awhile: new exterior shutters.

Here’s before, with yucky, crumbling old white plastic shutters:

IMG_0952

IMG_0901

Here’s the midway point, where we existed for a few months while the shutters were being fabricated:

dalhart house dec 07

And today, after I painted and installed the new ones:

IMG_2297

IMG_2296

These are custom vinyl shutters from ArchitecturalDepot.com that cost around $200 for two pair. I would have loved wood or composite ones, but they cost considerably more ($1,000+) and weren’t worth it to me as I think the end result is pretty good. Vinyl shutters from a hardware store cost even less than what I paid, but sizes are limited, and if you special order unusual sizes they will actually run more than what I paid online.

I also had a rather unusual problem of fitting these to the masonry that made it easier to work with vinyl. Let me explain.  I feel like a lot of the cheap shutters I see are misproportioned. They are usually way too narrow to be even close to realistic. Given that a shutter’s original use was to cover the window, I feel like visually they look better and less like they came from Home Depot if they are closer to half the width of the window. The top, or soldier, row of masonry on my house has every fourth or fifth brick angling out at the bottom. That made it a challenge to fit these wider shutters.

I used metal snips and my Dremel with a coarse drum sander attachment to carve away enough of the back of the shutter for them to fit. Tedious, but worth the end result.

IMG_2290

Another house in my neighborhood apparently has the same issue. The installer just moved the shutters down. Does this look goofy to anyone else?

IMG_2294

Mine are paneled style shutters that I ordered with a primed finish. Paneled are supposed to be more formal than louvered or the trendy board-and-batten shutters that seem like they are everywhere. I wasn’t going for formal, but I figured that these would be easy to paint and also match my paneled wood front entry door. I used the same oil-based high gloss exterior house trim paint on them that I used for the posts. Benjamin Moore “briarwood,” specifically.

They are attached using plastic anchors called shutterloks. It’s important to get the mortar holes right the first time because the shutterloks will not come out without a ton of effort once they are hammered. I drilled the shutter holes first and then marked using a small thin paintbrush the exact drilling spot onto the mortar. I painted the anchors to match the shutters. 

Would love to hear your thoughts on shutters!

Refinishing More Woods Floors, Without Sanding

Finished Hallway Floor, originally uploaded by espeedy123.


In my blog dashboard it’s so interesting to look at the search words that lead people here. Wood floor refinishing without sanding, or some combo of those terms, is always near the top.

Here’s the before image of that photo above:

IMG_2148

We recently finished redoing the remaining 50-year-old red oak floors in our house. Before we moved in all that space was covered with old carpet.

This last project included the den, hallway and a couple bedrooms with various closets. We refinished the rest earlier in three phases over the course of about a year. One room we did ourselves, the other two we hired professional help. All three sections received a different treatment or finish, and they all now look surprisingly the same.

Here are the main takeaways from all this:

  • For goodness sake if you’re going to refinish your floor do it before you move in. I learned this the hard way. Whatever inconvenience or rent you might have to endure on the front end will make up for headaches that come from moving too much stuff, dusting things, waiting for the floor to dry, etc.
  • Floor professionals, especially wood refinishers, have a vested interest in telling you that you need the entire finish sanded off, new quarter round applied, and so on. In many cases glue and other issues can be scraped or screened off. These remedies worked for me.
  • Old varnish finishes can be recoated with modern polyurethane or wax, as long as the old finish is thoroughly cleaned and prepared. When we redid the office floor, we applied wax which looks pretty decent (although it attracts dust).
  • The den, hallway and bedrooms are poly over old varnish that was screened first. The key there is to find a floor guy who won’t short you on the number of coats of sealant the floor will need.  Honestly I thought about asking the guy back to apply one last coat to the bedrooms, but the rug covers so much it didn’t seem worth it.  Old floors suck up the finish.
  • The formal living and dining area floor is a varnish/resin finish that was applied over the old varnish. It looks best out of all the areas, probably because that floor was walked on least, and because varnish is nice looking.
  • The more you know about your floor, the better your outcome.  Testing to figure out old treatments, and testing anything you intend to use on the floor to guage reaction ahead of time, will help create a better outcome.

Saving Pesto

Excess Basil, originally uploaded by espeedy123.

To make way for more fall seedlings I pulled out a couple basil plants that had become quite overgrown in my raised garden. There was so much of it that it took a good hour or so to pick off all these leaves from a single plant.

A good way to store basil is by making pesto and then freezing it. If you freeze the sauce in an ice cube tray and then repackage the cubes, it makes for easy retrieval and use later on.

My pesto recipe is….

1-2 garlic cloves
2 cups basil
2 oz. parmesan cheese
1/4 cup pine nuts
1/2 cup olive oil
juice of 1/2 lemon
salt to taste, at least a couple teaspoons

Whirred up in the food processor, this is tough to beat. I find it it difficult to mess this up, especially if you adjust the flavors at the end for acidity and salt. If you find yourself without enough basil, throw in some spinach to extend the amount of sauce the recipe produces.