Monthly Archives: April 2008

Landscape Planning Challenges

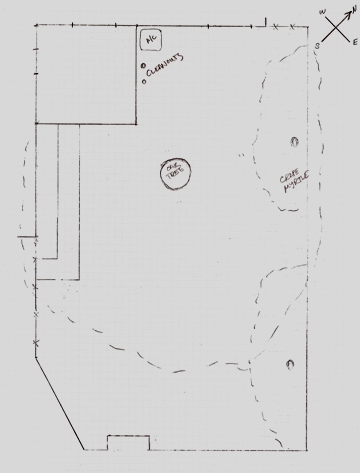
This is a diagram that shows the layout of my backyard.  I’m contemplating expanding my deck but am limited by the location of the A/C compressor, the plumbing cleanouts and the giant live oak tree.  It appears to me the only solution is to extend it toward the back fence.

Here’s what this looks like now:

IMG_1685

It’s a bit of a mess, isn’t it?  I think there may be a bird nesting in that nook between the eave and the aluminum roof.  The excess wires are an issue too.  The lowest ones are the cable and phone wires.

In addition to cleaning it all up, I plan to remove the porch roof and short brick walls, leaving perhaps part of the wall where the A/C is to screen and act as a bench.  If I extend the deck it would probably be at the same height as the concrete porch and made from composite decking.

If anyone has suggestions or deck wisdom they’d like to share please do.

Celebrating Earth Day with a New Flag

Earth Day flag, originally uploaded by espeedy123.

Happy Earth Day everyone!

To show my support for Mother Earth on her big day I ordered an official Earth Day flag. I just put up the bracket, and this is the first flag I’ve flown at the house.

If you plan to put up a flag bracket this spring and have an odd post or surface on which you’d like to attach a bracket, I recommend the United States Flag Store online. I have a metal pole porch post and ordered the Electric Way bracket and used a steel mounting strap to attach it to the pole. I spray painted the bracket the same color as the post so it wouldn’t be so noticeable.

How are you celebrating Earth Day???

How to Build a Tomato Trellis with a Cattle Panel

IMG_1648

This week I built a trellis for my raised veggie garden. I used a remarkable and inexpensive product called a cattle panel.

This is my first year using a cattle panel but I am anticipating it will work significantly better than a cage. It’s sturdier, taller, and has a lot more surface area for big climbing plants.

IMG_1642

Cattle panels are used for livestock fencing and consist of a lattice pattern of heavy gauge galvanized steel wires. They are sold at Tractor Supply stores for around $16 per panel. They are 4′ wide and 16′ long. I bought one panel and had to have the guy at the store cut it in half with bolt cutters in order to fit it in the truck. I tried cutting it with a hacksaw, and it worked but was really slow.

My raised bed is 8′ long, and I put the plants I plan to grow vertically in one row along the north side of the box: 3 tomatoes, one cucumber, one zucchini, one patty pan squash, one pole bean and one sugar snap pea. When I built the trellis the plants had already been in their spots for a few weeks. To avoid disturbing them, I decided to attach the trellis to the outside of the raised bed on the long wall.

I expect to grow super tall plants, so I decided to use the full length of two panels (8′ tall) situated side by side. To support the panels, I built a frame using 1/2″ EMT metal tubing and corner connectors from the hardware store. The frame materials cost around $6 total.

IMG_1638

IMG_1640

I didn’t have a big plan for how to measure and cut the framing materials. It worked pretty well to press the panels into the dirt — they stood up on their own while I measured the EMT for the frame.

IMG_1636

To support the trellis, I drove the EMT into the ground probably 6″ or so and attached it to the side of the raised bed with an EMT bracket.

IMG_1641

Finally, I used plastic cable ties to attach the panels to the frame.

IMG_1643

If anyone else out there is doing something cool with cattle panels or building a better tomato cage please comment!!

Better Garage Doors, Read My Story in Today’s DMN

From flickr.

So they weren’t as cool as the Buddha-faced one above, but the garage doors that made it into the story I wrote for today’s DMN about door trends were pretty cool.  Check it out here.

Filling the Raised Vegetable Garden Bed

The next step after building my raised veggie garden structure was filling it. As Lars pointed out on that initial post, the official Square Foot Gardening method calls for filling such a bed with the following:

  • 1/3 peat moss,
  • 1/3 compost, and
  • 1/3 vermiculite.

The compost is supposed to come from 5 different places, e.g. cotton burr compost, worm compost, tree compost, etc. I am sure this mix produces greatness, but I went a slightly different direction. I had a huge pile in the side yard of Living Earth Technology’s “clay buster” left over from the landscaping project out front. It’s a 50-50 mix of expanded shale and compost (who knows what type). Living Earth has a few locations around Texas and I highly recommend visiting them if you can. Here’s their description of expanded shale:

Expanded Shale is a by-product of highway building material processing. It is a gravelly clay particle that is kiln heated to about 1,600 degrees Fahrenheit. The result is material, which is very hard, yet porous and angular. As a soil amendment Expanded Shale aerates the soil yet absorbs water, releasing it gradually. This material positively breaks up heavy clay soils. In landscape applications it improves soil properties and allows plants more air and water.

Green, right? 🙂

Anyways, this is what I used to fill the bed, plus some finished compost we’d cooked up ourselves, and a big cube of peat moss from Home Depot. This was my first experience using peat, and I must say the wine people are right — red wine does smell like peat!!! I can now say that at wine club without being a poseur.

By using this mix I am making the assumption that since the clay buster sat out for a few months, the compost has broken down enough not to burn the plant roots. I also assume that the shale will act sort of like the vermiculite. The shale has the added advantage of not breaking down over time like I hear vermiculite does.

I cannot say with certainty that this mix is the ultimate for raised bedding. We will just have to find out as the growing season progresses.

Some shots of the planted garden:

April 3:

IMG_1571

April 7:

Veg. Garden April 7

How to Antique Brass, Concrete, Wood, and Other Surfaces

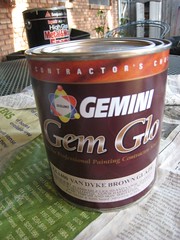
Recently I discovered a cool finishing product called Gem Glo.

Gem Glo Glaze

It’s an oil-based glaze made by Gemini used by professional painters and furniture refinishers to create an antique effect. That sort of finish is useful not only for making something look older, but also for making it look not so cheap.

I bought it to use on my concrete fountain project, but it came in handy just this week while I was finishing up my new mailbox:

New Mailbox

Here’s the before picture. Yikes!

IMG_1550

The (very important) address numbers I chose for the box were really shiny brass and originally stuck out like a sore thumb. I couldn’t bring myself to spend $20 a number at Restoration Hardware for an antique brass number, so these $3 ones from Home Depot were going to have to do.

I sponged some of the Van Dyke brown glaze onto them, and ragged the excess off with a bunched up cheesecloth. Here you can see the difference.  (With the glaze, without, and then obviously still in the package…)
IMG_1547

The glaze costs around $18 a quart at Texas Paint. I do not think you can get this at the big hardware stores. It is expensive, but the paint guy told me it would go a long way, and that appears to be true. It has a more watery yet more clingy consistency than paint, which makes it work better at sticking in nooks and crannies.

Have you used glaze or paint for antiquing? Please comment!