Monthly Archives: October 2008

Look What I Found in the Brush-and-Bulky Piles!

It seems the economic meltdown hasn’t stopped people from discarding valuable items.  I was on the prowl recently for good bagged composting leaves and ended up picking up all this stuff people put out for bulky garbage collection:
 

Free Stuff

Six 75-foot long soaker hoses.  These were all in one giant pile in front of a house in the next block.  I tested a couple out and it appears there is nothing wrong with them.  Just a couple weeks ago I bought a pair of these at Sam’s Club.  Unfortunate timing, but I will eventually find a good spot for all of them.  At Home Depot yesterday I priced this long variety at around $14 for each one!  What luck!!
 
A 10-foot section of steel edging.  I continually buy this product at Lowe’s as I work my way around the front landscape beds.  Each 10-foot section is $10, so this acquisition will save me enough to ….. I dunno, buy some junk on craigslist?!?!  🙂  It appears to be in good shape, so who knows why someone got rid of it.
 
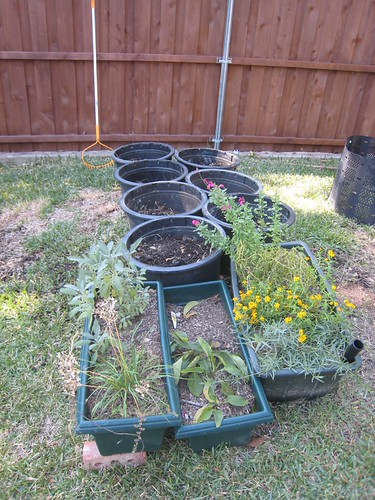
Several large, tubby plant containers.  These were out in front of a house someone is flipping.  It appears they held some Indian hawthorn from a nursery, based on the tags.  I like that they are short for their overall size.  I stuck them in a row out behind the vegetable garden where they will eventually grow something useful or beautiful.
 

Free Pots

Container Planting Area

 
And the grand prize …… a vintage Queen Anne solid wood coffee table by Bassett furniture.  Odd, right?  Seriously this was next to a bunch of grass clippings and lawn garbage.  It is solid wood and in pretty decent shape with just one chip on the top.  It was next to a box from West Elm, no doubt a cheap replacement that will last a fraction as long.  I don’t really need this table, but it is growing on me.  I may paint it, I may offload it on craigslist, I just couldn’t let it go to the dump.
 

Free Coffee Table

 
I also got a ton of leaves, which has become my new favorite pastime.  I’ll detail that in a later post.  Happy trolling!!

Making More Free Thyme

Woolly Thyme, originally uploaded by patrick_standish.

I love that garden magazine look of wooly thyme creeping between stones. I have a flagstone edge along my front flower bed, and I would love it if I could get thyme growing between all the nooks and crannies and spilling over onto the rocks.

It would cost a fortune to buy the dozens of little thyme plants at the nursery, so this spring I put a couple small thyme plants I received at the spring plant swap into a container out back. Here is what they spread into over the summer:

Earthbox Thyme

This morning I cut 5 inch patches out of the planter and started inserting them along the rock edge. I used a knife to get a clean cut, and so far I’m surprised how far the patch is going. I think it will look fabulous once it gets going in its new home! If only it didn’t take all summer to get this accomplished.

Thyme Between Stones

Improving the Square Foot Garden

“Homely Homer” Tomatoes, originally uploaded by espeedy123.

My fall tomatoes are going strong and starting to ripen. They are doing considerably better than my summer ones did. I imagine it’s because I chose better varieties, and because it’s easier to keep them watered when it’s slightly cooler outside.

I also decided to change up the trellis for the fall garden. This old setup with the rigid panel made it difficult to reach through to the middle of the garden. It also didn’t seem very feng shui.

IMG_1642

I needed something more flexible, that would allow tieing up tomatoes and beans in other parts of the box. To achieve this I decided to turn the cattle panel into a roof instead of a wall. Using a few more piece of conduit and zip ties, this is what I came up with:

IMG_2283

So far it seems to be a much more workable system. Here is the mound of pole beans climbing up the string:

IMG_2342

And the string on the trellis:

IMG_2343

The overall garden:

IMG_2344

Installing New Exterior Shutters

Installing Shutters, originally uploaded by espeedy123.

This week as economic turmoil and political gamesmanship ruled the news I felt like focusing my attention more intently on the house. I tackled a project that’s been sitting undone for awhile: new exterior shutters.

Here’s before, with yucky, crumbling old white plastic shutters:

IMG_0952

IMG_0901

Here’s the midway point, where we existed for a few months while the shutters were being fabricated:

dalhart house dec 07

And today, after I painted and installed the new ones:

IMG_2297

IMG_2296

These are custom vinyl shutters from ArchitecturalDepot.com that cost around $200 for two pair. I would have loved wood or composite ones, but they cost considerably more ($1,000+) and weren’t worth it to me as I think the end result is pretty good. Vinyl shutters from a hardware store cost even less than what I paid, but sizes are limited, and if you special order unusual sizes they will actually run more than what I paid online.

I also had a rather unusual problem of fitting these to the masonry that made it easier to work with vinyl. Let me explain.  I feel like a lot of the cheap shutters I see are misproportioned. They are usually way too narrow to be even close to realistic. Given that a shutter’s original use was to cover the window, I feel like visually they look better and less like they came from Home Depot if they are closer to half the width of the window. The top, or soldier, row of masonry on my house has every fourth or fifth brick angling out at the bottom. That made it a challenge to fit these wider shutters.

I used metal snips and my Dremel with a coarse drum sander attachment to carve away enough of the back of the shutter for them to fit. Tedious, but worth the end result.

IMG_2290

Another house in my neighborhood apparently has the same issue. The installer just moved the shutters down. Does this look goofy to anyone else?

IMG_2294

Mine are paneled style shutters that I ordered with a primed finish. Paneled are supposed to be more formal than louvered or the trendy board-and-batten shutters that seem like they are everywhere. I wasn’t going for formal, but I figured that these would be easy to paint and also match my paneled wood front entry door. I used the same oil-based high gloss exterior house trim paint on them that I used for the posts. Benjamin Moore “briarwood,” specifically.

They are attached using plastic anchors called shutterloks. It’s important to get the mortar holes right the first time because the shutterloks will not come out without a ton of effort once they are hammered. I drilled the shutter holes first and then marked using a small thin paintbrush the exact drilling spot onto the mortar. I painted the anchors to match the shutters. 

Would love to hear your thoughts on shutters!